
Recently, we’ve had a few emails come in asking about what kind of gear we use to capture photos and video for skatehouse. Rather than just post a list of my gear, I’m going to explain how I shot the cover of this month’s SkateSlate magazine.
We were doing a big article on downhill in Malibu in the magazine; so I wanted to go get something that would relate and show the Southern California landscape, with sick roads and mountains rising out of the ocean. Originally from Northern California, these days James Kelly is about as Malibu-identified as it gets. A consummate professional, I knew he’d work with me to get a good shot. We headed out to one of our favorite runs up in north Malibu and got there in the early afternoon.
After warming up with a couple runs down the tight, fast, technically challenging hill, my creative juices were flowing and James was ready to bust out. We pulled the car over at a left bend with a good view of the ocean and a double set of sweet hairpins. I pulled out my trusty Canon 7D and 24-105mm F/4L lens and got up on my car for a good vantage point. James threw down a few slides while I tried out different angles and Calvin spotted for cars.
We were shooting around 2pm and the sun was pretty harsh; so I set up a couple flashes (Canon Speedlite 430EXIIs wirelessly triggered by Pocket Wizard Plus 2s) to fill in the dark shadows and help James pop out of the photo a little more.
To totally stop time and get a super crisp skate shot, you have use a shutter speed of 1/1000th of a second or faster. Most flashes can’t synchronize with shutter speeds that fast—my system tops out at 1/250th—so you have to follow the skater with the camera, which gives you a slight panning effect.
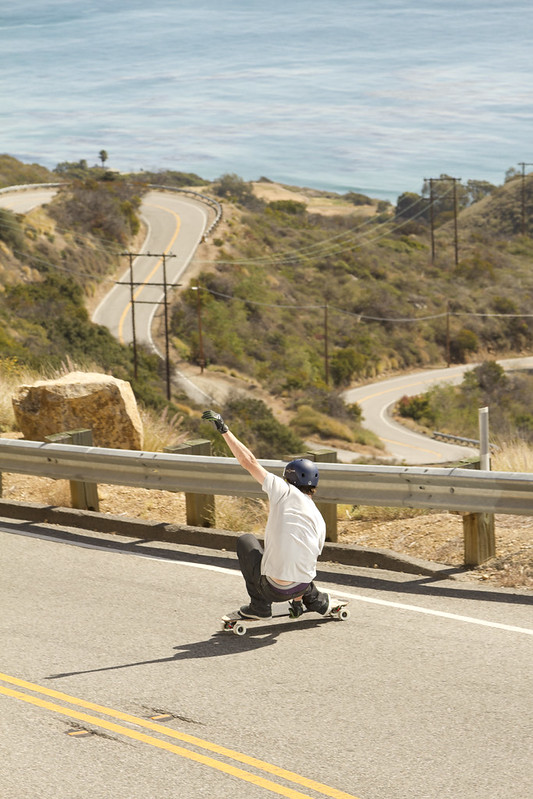
I stood on my car to get James in the foreground and a good view of the hairpins behind him. After a few tries, we had a sick one. Straight out of the camera, it looked like this:

Here’s the next frame, without flash:
 It’s pretty similar; but the flash fills in the shadows and draws your eye to James.
This picture looked pretty damn good from the start; so it didn’t need much photoshop. First, I used the lens profile correction tool to eliminate the lens distortion and chromatic aberration. After tweaking the overall brightness and contrast, I made the ocean a little more blue, lightened up James’ pants, and sharpened the whole thing before sending it off to my editor. The final version looked like this:
From there, we threw the text on it and sent it to the printer.